IKEA dining-table hack!
Hi Anyone!
An idea to hack an old IKEA dining table!

My husband came home one day early this summer to notice that our dining-table was gone. It was a simple, black "IKEA - Bjursta", expandable 6 person dining table that had lots of marks and chips on it and it was ugly!
It didn't take too long for him to see that it was in tens of pieces on the patio floor... What on earth!!!
I had dismantled it! Unscrewed all possible screws and put every piece beside each other...

It had been a while that we have spoken about changing our dining-table for something else; something that would stand out and be more timeless but still be a table that would look as if it would have a history of 100 years behind!
We had seen and fallen in love with a very beautiful and original dining-table at JC Perreault in Laval (Qc., Canada) . It was made out of some kind of dark, oriental wood, have 2 large pillars that would hold a huge wooden tabletop on them. Simply beautiful... and expensive!
A few weeks later we were leaving for a trip to Scandinavia and had saved some money for that precise occation, not a table of CAD 1.000$. So we decided that there would NOT be a new table.
Instead, we had a marvelous trip to Europe!
The table feet and base was made of wood so I was playing with the idea of redoing something completely different out of it. After evenings & nights spending time on Pinterest, gathering ideas, I decided to do it myself! I was so full of ideas and wanted so much to see the final result!!!
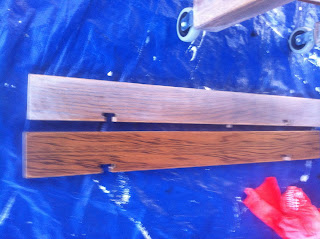
I took away the black color from the feet and top with a sander. Started with a more gritty paper and finished with a finer grit. I also sanded all the new pine panels with a fine grit sandpaper.


Then I stained them with Minwax Wood Finish (Provincial). I used a foam brush to put it on, let the wood suck the color for 5-10 minutes before wiping the excess color off with a clean cloth, in my case an old t-shirt.
The table top is made of mdf-wood so I could not just sand off the color, I needed to do something else. First I thought about replacing the existing top with a top made of wood panels but decided to leave the existing top and just glue and drill the wood-panels to it (I used red pine).
Once ready, the old mdf-tabletop is visible from under the panels so it would need to be hidden with 1" thick wood frame, cut into custom pieces, stained as the wood panels & base and attached to the mdf-top.
I have a clock on the wall that was the source of my inspiration when choosing the finish. I wanted to have the same vintage, worn-wood look. Here's what I did:
I mixed a bit of water to a white floor paint I had left from my china cabinet job. Wiped it on, left again for 5-10 minutes before wiping it off with a rag. This time it was a wet rag! I let it dry for a day before starting to wipe on the protecting layer of varnish.


As protection I used an oil based hybrid (semi-gloss) varnish from Saman. I put 2 layers of varnish before assembling the table together, with 3-4 more layers after assemblage to "close" the cracks of the panels.

I am so happy and proud of my table once it is ready. I think it fits in my house and brings a whole lot of warmth in my dining room. It is also a bit bigger since the panels are exceeding the original top so we have more space (which is always good when inviting people).
Since my table is expandable, I have the 2 pieces still to do as a future project... for next summer!


An idea to hack an old IKEA dining table!

My husband came home one day early this summer to notice that our dining-table was gone. It was a simple, black "IKEA - Bjursta", expandable 6 person dining table that had lots of marks and chips on it and it was ugly!
It didn't take too long for him to see that it was in tens of pieces on the patio floor... What on earth!!!
I had dismantled it! Unscrewed all possible screws and put every piece beside each other...

It had been a while that we have spoken about changing our dining-table for something else; something that would stand out and be more timeless but still be a table that would look as if it would have a history of 100 years behind!
We had seen and fallen in love with a very beautiful and original dining-table at JC Perreault in Laval (Qc., Canada) . It was made out of some kind of dark, oriental wood, have 2 large pillars that would hold a huge wooden tabletop on them. Simply beautiful... and expensive!
A few weeks later we were leaving for a trip to Scandinavia and had saved some money for that precise occation, not a table of CAD 1.000$. So we decided that there would NOT be a new table.
Instead, we had a marvelous trip to Europe!
The table feet and base was made of wood so I was playing with the idea of redoing something completely different out of it. After evenings & nights spending time on Pinterest, gathering ideas, I decided to do it myself! I was so full of ideas and wanted so much to see the final result!!!
I took away the black color from the feet and top with a sander. Started with a more gritty paper and finished with a finer grit. I also sanded all the new pine panels with a fine grit sandpaper.


Then I stained them with Minwax Wood Finish (Provincial). I used a foam brush to put it on, let the wood suck the color for 5-10 minutes before wiping the excess color off with a clean cloth, in my case an old t-shirt.
The table top is made of mdf-wood so I could not just sand off the color, I needed to do something else. First I thought about replacing the existing top with a top made of wood panels but decided to leave the existing top and just glue and drill the wood-panels to it (I used red pine).
Once ready, the old mdf-tabletop is visible from under the panels so it would need to be hidden with 1" thick wood frame, cut into custom pieces, stained as the wood panels & base and attached to the mdf-top.
I have a clock on the wall that was the source of my inspiration when choosing the finish. I wanted to have the same vintage, worn-wood look. Here's what I did:
I mixed a bit of water to a white floor paint I had left from my china cabinet job. Wiped it on, left again for 5-10 minutes before wiping it off with a rag. This time it was a wet rag! I let it dry for a day before starting to wipe on the protecting layer of varnish.


As protection I used an oil based hybrid (semi-gloss) varnish from Saman. I put 2 layers of varnish before assembling the table together, with 3-4 more layers after assemblage to "close" the cracks of the panels.

I am so happy and proud of my table once it is ready. I think it fits in my house and brings a whole lot of warmth in my dining room. It is also a bit bigger since the panels are exceeding the original top so we have more space (which is always good when inviting people).
Since my table is expandable, I have the 2 pieces still to do as a future project... for next summer!


Comments
Post a Comment